The Catapult Announcement feature helps users collate and distribute information on the homepages of their district and school websites. The Announcement feature lets you prioritize announcements, integrate with social media and post news directly from your mobile device. Districts can also push important announcements to all or selected school sites. This article will go over the steps to creating and sharing announcements.
Instructional Video
To Add an Announcement
-
Log in to your Catapult CMS account.
-
Click on ANNOUNCEMENTS on the top band of the page:

or click the ANNOUNCEMENTS/BLOG button on the Dashboard:

3. If you have access to only one site, you will go straight in to your Announcements editing screen. If you have access to multiple school sites, you will need to find your school site and click LOAD ANNOUNCEMENTS:

4. Select a Feed: The first time you log in, you will also need to select which feed you are accessing. Most districts have only one feed for the homepage of each site; however, the software has the capability to integrate multiple feeds, such as District, School and Athletics announcement feeds.
5. Click NEW POST and add information, using the following instructions.
Post Details
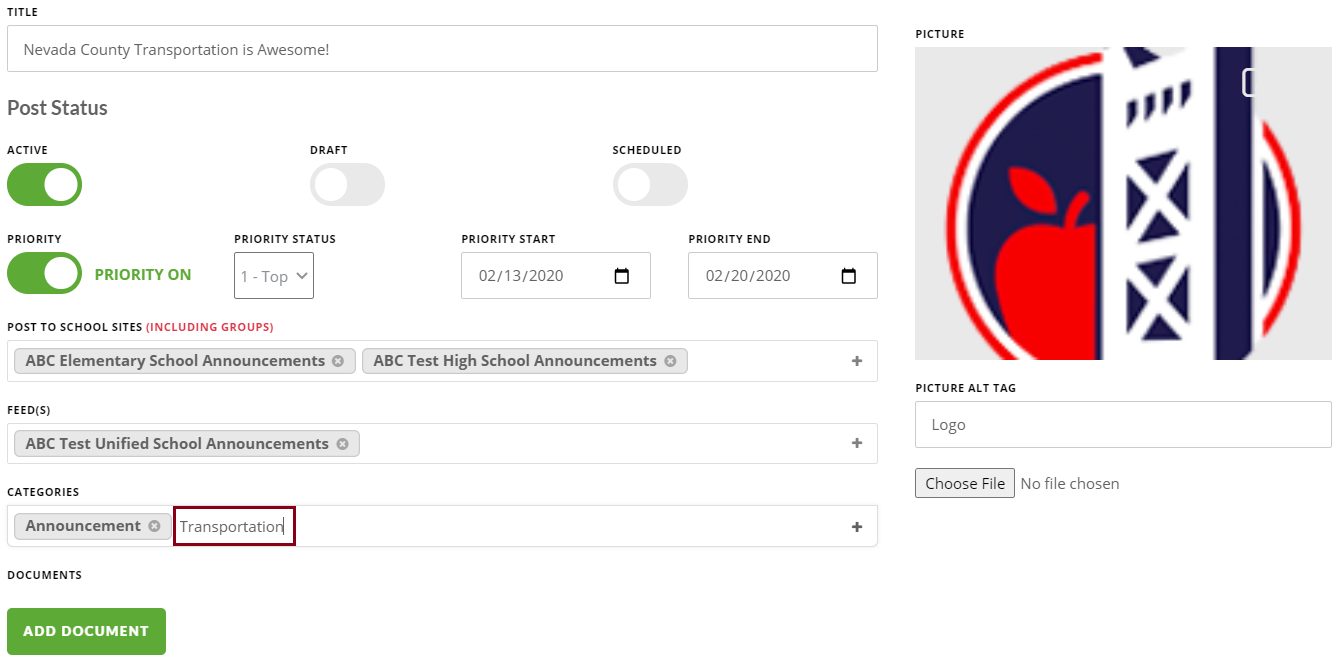
Title
A title is required. You will want to add something eye-catching, if possible.
Post Status
You have three options for selecting your Post Status:
- Active – The post will be live immediately after it is created.
- Draft – A post that isn’t quite ready to be live yet.
- Scheduled – Scheduled posts will become live once you select your desired dates and times.
Once you have saved your post, the default is for your active posts to be ordered chronologically by post date, with the newest post showing first.
Priority Toggle
The Priority toggle allows you to overwrite the default order and set your priority item to appear at the top of the announcements feed.
Districts can set the Priority setting to Top, Mid, or Low priority. School sites have only Mid or Low priority, which means that a district can post items above a school's posts. If you are a school site maintainer and wondering how a post got on your page, someone at the district probably wants it there.
Post to School Sites
District maintainers can post important posts to all or selected school sites. We suggest that districts push only posts important districtwide notifications to the school sites. Otherwise, we recommend that you allow schools to update their own announcements.
Feeds
Although most districts and schools have only one main announcement feed on their homepage, you may use the announcement feature to add additional feeds throughout your website. Some examples of additional feeds are sports events, activities, job boards, parent clubs, and after-school events.
Categories
Adding categories allows your post to be sorted more accurately. For example, if your announcement post is about an upcoming sporting event, you may want to include ‘sports’ and/or ‘after school’ to your categories list.
To add a category, just click in the CATEGORIES area. Any categories previously defined will pop up. If you want to make a new category, just type in the new text, press ENTER and your category will join the list.

Content
Once you have the basic information set up for your post, you are ready to add the content! You can add text, pictures, videos, and/or documents to your post, depending on what you are trying to achieve. When adding attachments, hit SAVE before continuing to make sure that the attachment will show up when your post goes live live. Also note that any pictures or visuals require a simple alt tag description in order to remain ADA compliant! If the SAVE POST button does not seem to work, you probably forgot something. Scroll to the top of the page to see an error message in red – usually it's the title or alt tag that needs to be added before saving.
After You Create a Post
On the Manage Post page, you will see three options on the right side of each announcement post:

- EDIT POST – If you need to make changes or additions, you can hit EDIT POST and go right back into your post.
- SHARE POST – If you would like to share to social media, hit SHARE POST and select Facebook or Twitter. The first time you do this, make sure you allow popups from this site and share as a page.
- DELETE POST – If you wish to permanently delete a post, you can do so easily with the DELETE POST button.
